How should a DIALux office-lighting calculation check UGR from different viewing directions?
Place office glare checks around real workstation sight lines so one product label or favourable observer direction does not stand in for the whole DIALux result.
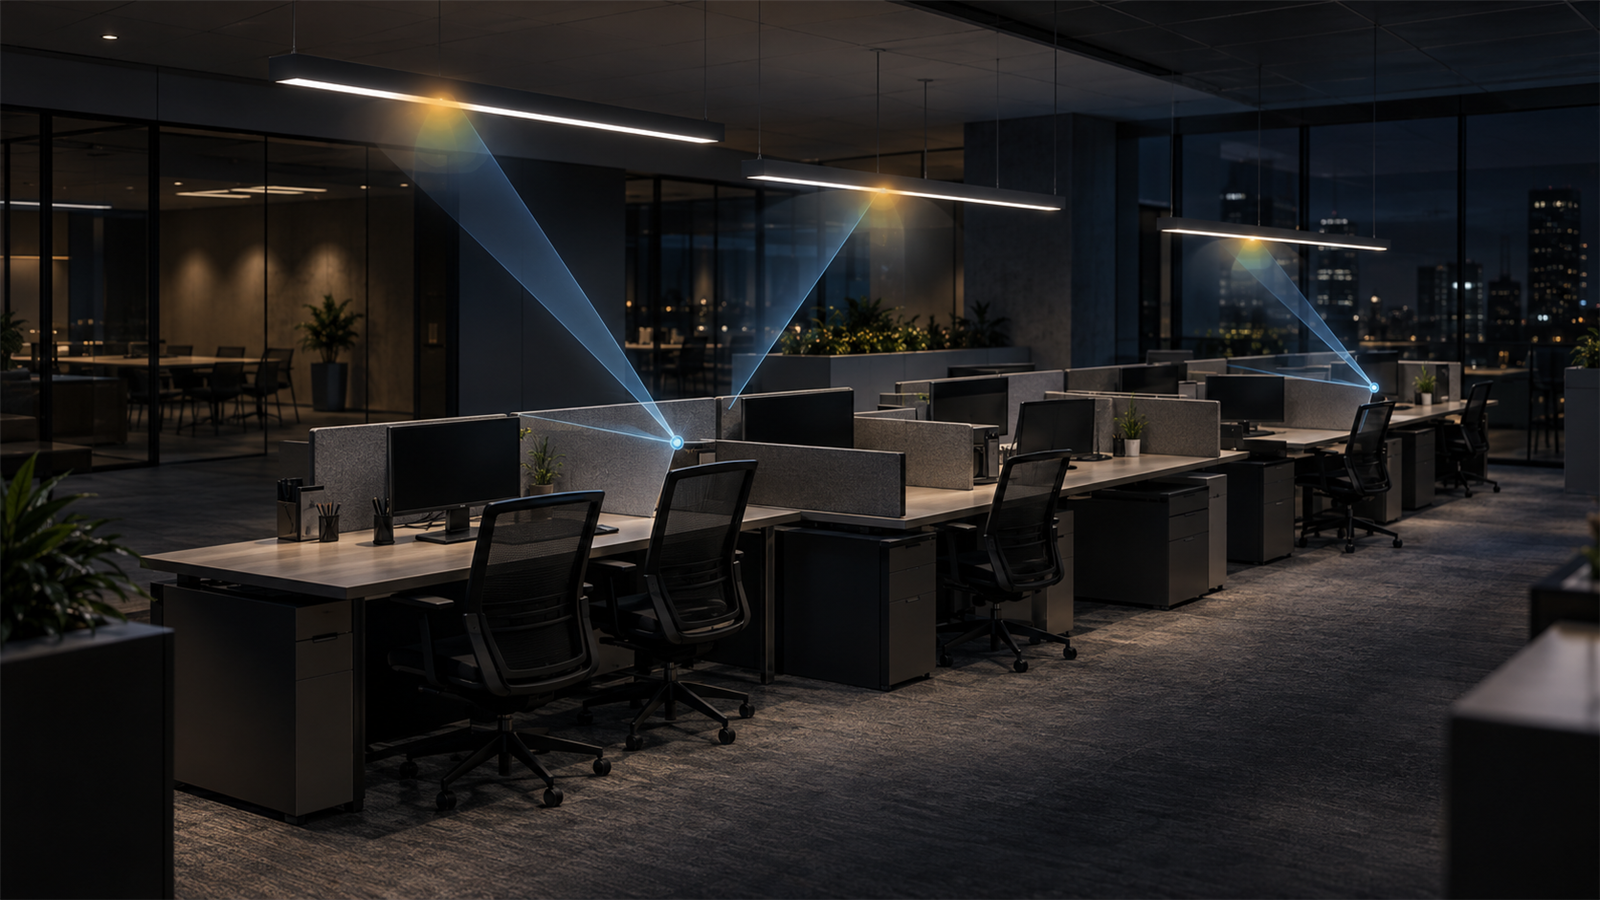
The short answer: check the views people actually use
A DIALux office-lighting UGR calculation should test the glare condition from representative occupied positions and viewing directions, not rely on a single luminaire catalogue claim or one favourable room orientation. Fix the workstation layout, screen directions, seated or standing eye level and relevant luminaire scene first; then review the applicable room glare result and any additional UGR points or surfaces needed to explain critical sight lines.
CIE 117 states that the Unified Glare Rating depends on observer position and direction of view. DIALux evo calculates room glare using the CIE 117 tabular procedure and can also document UGR results. Those tools support project evaluation, but the client, consultant and relevant authority must define the applicable activity, limit and representative observer conditions.
1. Begin with the approved workplace layout
Request the current architectural, furniture and reflected-ceiling plans. Identify desk rows, meeting tables, reception positions, circulation routes, partitions, monitor orientations, windows, luminaires and any standing workpoints. An open office with desks facing two or four directions cannot be represented honestly by one assumed view down the longest room axis.
Mark the positions where people spend meaningful time and the directions in which they normally look. Include a second direction where a person regularly turns towards another screen, collaborative table, presentation wall or circulation route. Avoid filling the room with arbitrary observers; choose a compact set that can change a design decision and document why each one matters.
2. Do not confuse a luminaire UGR table with the installed room
A manufacturer's UGR table is based on standardised room proportions, reflectances and viewing directions. It is useful product information, but it is not a universal certificate that every arrangement using that luminaire will remain below the same value. Real spacing, mounting height, room shape, surface reflectance, luminous area, orientation and observer position can change the installation result.
CIE 117 describes both the UGR formula and a tabular method using reference conditions. DIALux evo 11 introduced room glare calculation according to that tabular procedure and compares it with the largest allowed glare value from the selected profile. Treat the catalogue table and project calculation as related but different evidence, and record the exact luminaire data used.
3. Fix geometry, reflectance and photometry before interpreting glare
Model the actual room dimensions, ceiling form, partitions and large objects that affect the luminous background. Apply supported ceiling, wall, floor and furniture reflectances rather than selecting values that improve the glare result. Confirm the maintained-lighting basis and the active lighting scene so the illuminance and glare review describe the same intended operating condition.
Use the exact IES, LDT or manufacturer data for the selected product, lumen package, optic and diffuser. Verify luminaire dimensions, luminous-area orientation, mounting height and rotation. A generic panel with a similar wattage cannot establish the glare behaviour of the proposed luminaire, and a rotated linear fitting can change which viewing direction is more critical.
4. Choose observer positions and directions deliberately
Place the glare checks at representative occupied locations and use the eye height agreed for the task. Align each view with the workstation, display or room direction the person actually faces. For back-to-back benching, this may require opposite views; for perpendicular desk groups, it may require checks in both room axes; for reception or presentation spaces, it may require a separate directed view.
Keep a clear plan or 3D view showing every position and arrow. If a UGR surface is used to scan a wider region, document its height, orientation and interpretation instead of reporting only the most convenient point. A maximum value should be traceable to a location and sight line so a reviewer can understand which luminaires and geometry control it.
5. Compare lighting options without changing the test
When comparing layouts, optics or dimming scenes, keep the room geometry, surface properties, observer set, calculation settings and result scale consistent. A lower UGR obtained after moving the observer away from the difficult view is not an improvement to the lighting scheme. Recalculate the complete room after any material change to spacing, mounting or orientation.
Diagnose the cause before adding more luminaires. Useful responses may include moving rows away from dominant sight lines, changing the spacing-to-height relationship, selecting more suitable luminous-area control, rotating a linear distribution, increasing background luminance appropriately or coordinating workstation orientation. Check illuminance, uniformity, cylindrical or wall-related needs and energy implications alongside glare.
6. Treat screens and daylight as coordination questions
UGR addresses discomfort glare from the electric-lighting installation under its defined method. It does not by itself prove that computer screens are free from veiling reflections, that windows will not cause glare, or that every daytime condition is comfortable. Coordinate luminaire luminance, screen orientation, window position, shading and surface finish as separate but related office-lighting questions.
DIALux evo supports indoor geometry, real luminaire data, furniture and lighting scenes, and its daylight workflow can account for windows, orientation and daylight-control systems. Use the appropriate analysis for the question being asked. Do not present one night-time UGR result as a complete visual-comfort assessment for a glazed office.
7. Issue evidence that another reviewer can reproduce
The report should identify the drawing revision, room and workstation geometry, activity profile, exact luminaires and photometric files, mounting and orientation, surface reflectances, maintenance basis, lighting scene, observer eye height, every position and viewing direction, applicable limit and controlling result. Include a plan that links the reported UGR values to the occupied layout.
State limitations such as provisional furniture, movable monitors, unconfirmed finishes, unmodelled window glare, future tenant layouts or an activity criterion awaiting consultant confirmation. A DIALux office calculation can support option selection, coordination or a submission package; it does not guarantee comfort for every person or grant authority acceptance.
Office UGR decision checklist
Before modelling, confirm: (1) the approved room, ceiling and furniture plans; (2) actual desk and screen orientations; (3) representative seated and standing views; (4) exact luminaire photometry, luminous area and rotation; (5) supported surface reflectances and maintenance assumptions; and (6) the applicable activity profile and glare limit.
Before issue, verify: (1) every glare check has a named position and direction; (2) opposite or perpendicular workstation views are covered where relevant; (3) comparison options use the same observer set and settings; (4) the controlling value is traceable; (5) illuminance and other visual criteria remain acceptable; and (6) daylight, screen reflections and approval limitations are stated separately.
Authoritative references used for this guide
DIAL's current indoor-lighting documentation describes plan- or BIM-based room construction, real luminaire data, adjustable luminaire orientation, calculation options, result monitoring, lighting scenes and structured documentation. DIALux evo's release documentation explains that room glare is calculated with the CIE 117 tabular procedure and compared with the allowed glare value from the selected profile.
CIE 117-1995 defines the practical UGR system and explicitly recognises the effects of observer position and direction of view. Use the licensed standard, the applicable national adoption and the project brief to select criteria and representative views; this article does not reproduce or replace them.
Frequently asked questions
Does a luminaire labelled UGR below 19 guarantee an office will meet that value?
No. A product table uses standard reference conditions. The installed result depends on the actual room, reflectances, spacing, mounting, orientation and observer position and direction. Check the complete project against the applicable criteria.
How many viewing directions should a DIALux office calculation test?
There is no useful universal count. Test the representative directions created by the real workstation and room layout, adding a second or opposite view when it can control the decision. Record every position, eye height and direction in the report.